It's high time I shared some of what I learned from the Joyography photography workshop I attended in March. I highly recommend you look into attending the next one in September.
First off, it was SO MUCH FUN! Presenters Marisa and Megan are as hip and as they are down-to-earth. The day-long workshop was very well planned, combining a morning of useful instruction, individual mentoring and practice in an antique store overflowing with eye candy. How could you not want to take pictures? Then, following a yummy lunch, a family arrived so we could work on taking portraits. The workshop ended with a feedback session and an overview of basic Photoshop functions.
I left exhilarated.
But then I got home and loaded the images from my camera onto my computer where I could see them more clearly. I was deflated. I was glaringly (or is that fuzzily?) reminded of the focus problems that have plagued me since, oh, I don't know, forEVER -- with every camera I've ever owned. I can't rely on my latest camera's fickle autofocus, so I always focus manually, which can be hit and miss. (Maybe it's something to do with the refraction of my eyeglasses as I look into the small viewfinder?) Sadly there were a lot of misses at the workshop. Yet with Marisa's guidance I was able to compensate for my camera's light meter being completely out of whack. Maybe there's hope for my focus. (The light meter has since been fixed -- can my eyes be next?)
Enough about me, on to some tips. The conference was all about using SLR (single-lens reflex) digital cameras, with the emphasis on using manual exposure settings exclusively. If your camera is a point and shoot, keep reading anyway, for principles of lighting and composition still apply.
Lighting
This picture of dice in a jar was taken indoors, next to a window.
A photograph is captured light, right? So photographers are really light hunters. Use natural light whenever you can, even indoors. Use the flash as a last resort. Sometimes where the action takes place dictates where we shoot. Other times, though, such as when taking portraits, we can set the stage. Look for areas of soft, diffused light such as near windows, on a porch or even in the shade. Early morning and afternoon (within an hour of sunrise and about 90 minutes before sunset) offer prime lighting conditions. Overcast days are great because they temper the sun's harsh shadows, which are worst mid-day. Alternately, stage your subject with his back to the sun.
Composition
Learn how to emphasize the subject you want. Do this by moving in closer, removing distractions (including those in the background), and framing your subject.
Some people might balk that I cut off the top of this little cutie's head. That's so old school! By composing the shot this way I hoped to capture more than just a cute little boy; I wanted to convey the sweetness of a young child sharing. Can't you just imagine him saying to you, "Here!"
This next shot could have been fine as a cropped close-up of the couple kissing. I liked the inclusion of the sign above, however, especially its announcement of "treasures."
Yes, I know the couple is slightly out of focus here {hangs head in shame}. I'm including it anyway to show how altering your composition gives interest. I purposely turned my camera the same direction of the arrow.
The best photographs tell stories, and detail shots are another narrative tool.
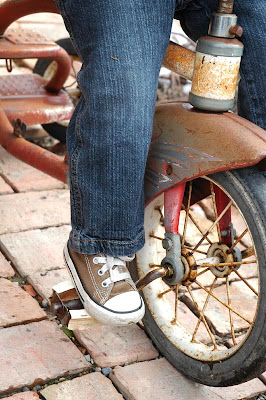
I like this next one for the contrast of the tiny 2-year-old foot pedaling the rusty antique tricycle.

Use composition to reinforce universal emotion. While I have other shots showing the whole scene of the father helping his toddler climb down the side of an old fire truck, this one strips away all that to show something else: Doesn't the little boy's intense upward gaze relay his trust? (At least that's why I like this shot.)
Another look at universal subjects: This next picture, with her contemplative expression, makes me feel a little wistful for my own childhood. I remember sometimes feeling too small, looking ahead, but not always being sure what was coming.
I took all of the previous pictures at the workshop, I took the following ones this month.
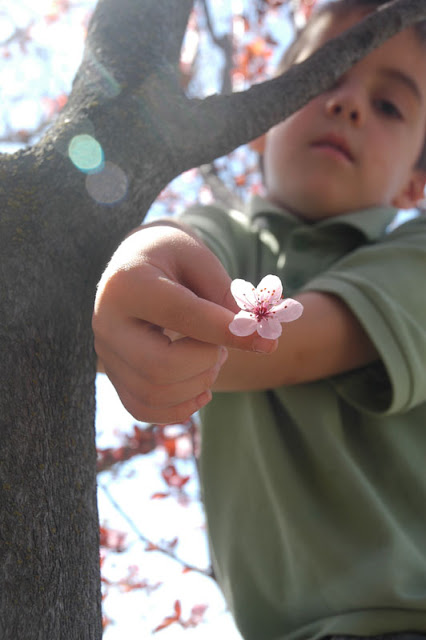
Get down and dirty for creative compositions. I was on my back looking up at James in the tree.
Manual exposure settings
Using manual settings allow you to manipulate light and better tell your story. It allows you to have a fast shutter speed for action shots, for instance, or to fine-tune your lighting -- exposure.
Exposure is a three-way dance of shutter speed, ISO and aperture (shutter opening). F/stops are aperture settings. As I understand it the term ISO actually comes from film use, how quickly film cells would absorb the light and then crystallize. The same concept translates to digital, or how quickly the receiver stores data.
One analogy I've read is like this: Light is to a picture what water is to a plant. It's all in the delivery. Aperture is how wide your hose is, shutter speed is how long you keep the faucet on, ISO is water pressure. If you have a narrow hose, you'll need to keep the faucet turned on longer to deliver the same amount of water than with a wide hose. Your camera's (working) light meter will tell you when all of these settings line up for exposure. In auto mode the camera does the same thing, but it can often get tricked -- like say, compensating for bright sun in your background, which can darken your subjects' faces. I actually "overexposed" the tree picture by a few hash marks on my camera's meter, to lighten up James' face.
I learned at the workshop how to use ISO in my camera, which was a revelation! Since then, I've taken lots more pictures indoors without a flash by raising the ISO setting.
The selection of aperture defines depth of field, another composition tool. A small f/stop number, like f3.5, gives a narrow band that will be in focus. This means you can blur backgrounds by focusing only on your subject.
Here, the main point of my picture story was James giving the blossom. Because I had a low f/stop the flower is in sharper focus than he is in the near background. The branches behind him are softer still.

Here's another illustration of depth of field. First, Samuel lurking behind branches.
Then, maintaining the same f/stop I changed my focus to reveal Samuel framed by those very branches. (Milk mustache and all). Kind of a cool effect.
Obviously there is a lot to photography, and I am but a student. While I am still learning to be technically proficient, I already have a long held love of photography as a way to capture the everyday moments. To me those are the best portraits. I could have taken a posed picture of Elise and her grandpa ("Say cheese!") but I prefer these much more:
Helping grandpa peel potatoes for Sunday dinner. No flash was used (for the photo, silly!).
These two show different executions: in the first Elise is in focus; in the second the focus is on the plaque on the windowsill. Families are Forever. But I wish they'd been switched, because her expression below is beautiful.


4 comments:
Thanks for sharing. That sounds like an incredible workshop. Nate is always using those photo terms with me and I'm clueless.
@Kate, Bah! You shouldn't be clueless now. Guess I didn't do my job. :)
I'm so glad you came to the workshop. You really have an eye for composition!
Thanks for all the tips! I think the very last picture of Elise and Grandpa is my favorite because of how it illustrates the Families are forever sign. you are so talented!
Post a Comment